How to Use This Page
This reference guide provides an overview of the enhancements included in the May 17 release. It is designed to help users quickly understand what’s new, what’s changed, and how these updates impact their workflows.
-
Start with the Quick Reference for the most common tasks and definitions.
-
Follow the Step-by-Step Workflows when performing inventory updates.
Quick Reference
|
Topic |
What You Need to Know |
Where to Take Action |
|---|---|---|
|
Seeding Inventory List |
Following this release each location will have their own separated inventory list. There will no longer be a shared company wide inventory. Each location will need to choose an initial inventory list from 1 of 3 options:
|
View> Inventory>View by Location |
|
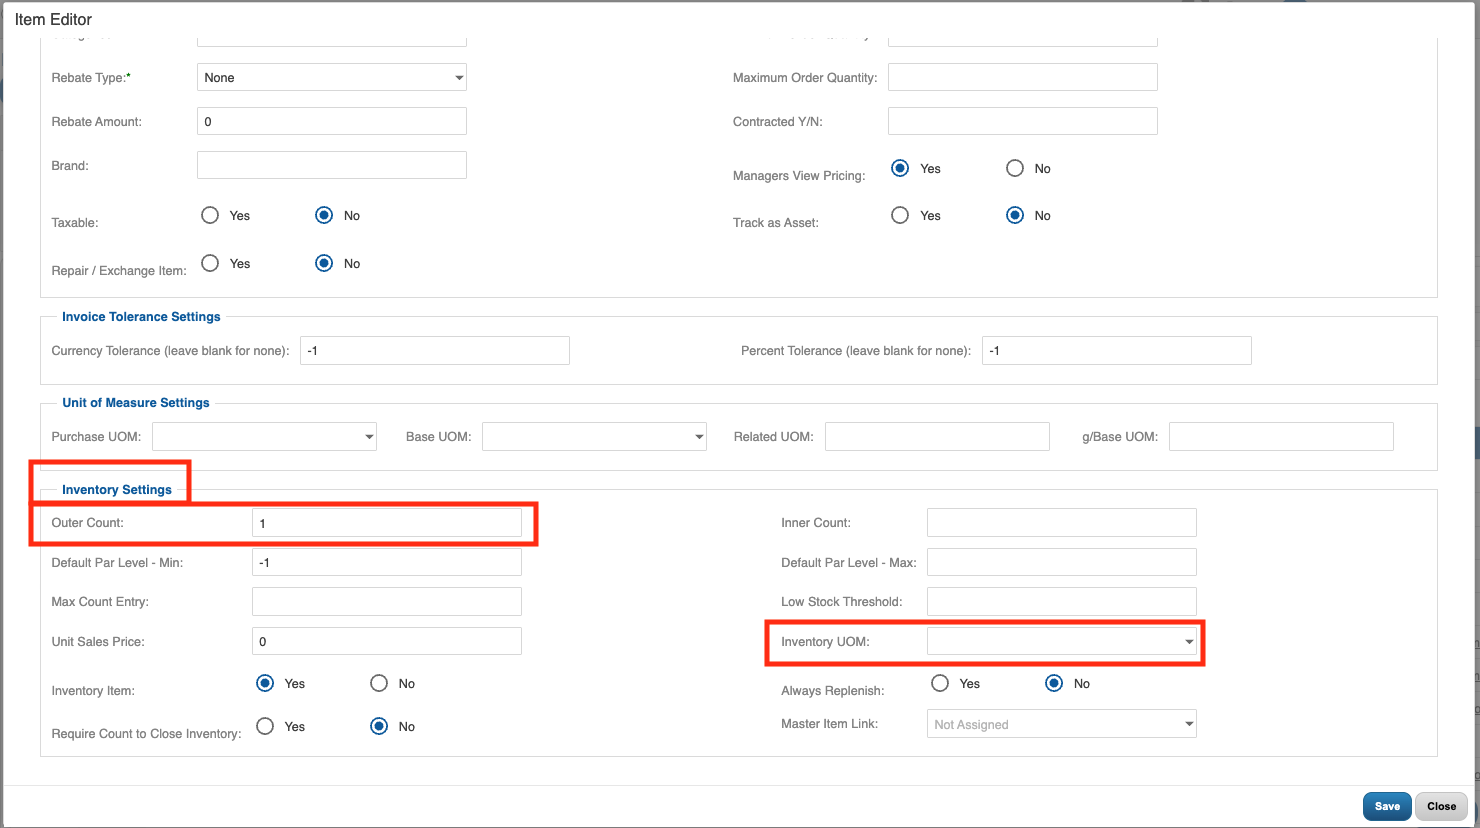
Required Configuration fields |
Inventory actions and items cannot be saved if required configuration or data is missing or invalid. The unit of measure has also been added to the Inventory Assignment column to enable users to easily reference the impact of the count and stock changes made. Only Inventory Administrators and Corporate users will be able to edit these items. (Reference Q1 2026 Inventory Enhancement Reference Guide -Inventory Admin Flag)
|
View> Item Administration> Item Editor Screen Inventory Settings required fields:
Receiving Screen
|
|
Master items on count sheet |
When a user marks an item as a master item, the system automatically adds the item to the count sheet. |
View>Receiving
|
|
Add/Remove Items from Inventory |
Users can add items to an item list using a streamlined, easy‑to‑follow workflow. |
View> Inventory>View by Location |
|
Added reverse entry |
Users can perform a reverse entry that correctly updates inventory counts and reporting totals.
|
View> Inventory>View by Location>(Choose Location)>(Choose Storage Location)>Select Item |
|
Receiving Page Display |
Inventory UOM and column tool tips are now available. |
View>Recieving> (Choose Location)>(Choose PO Number)>Receiving Invoice Page |
|
Inventory Item locations |
Users will be able to see what locations and on hand amounts for each location the item is available at. |
View> Item Administration |
Step-by-Step Workflows
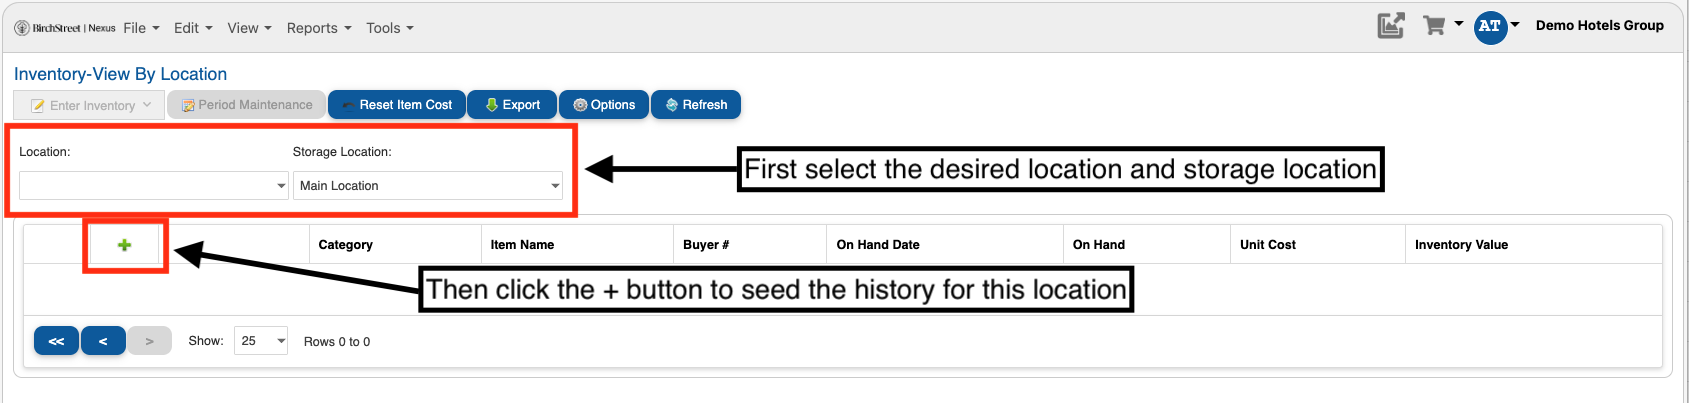
1. Seeding Your Inventory List
Each location now maintains its own separate inventory list. Follow these steps to set up your location's initial inventory:
-
Navigate to View > Inventory > View by Location
-
Select the location you want to seed an inventory list for.
-
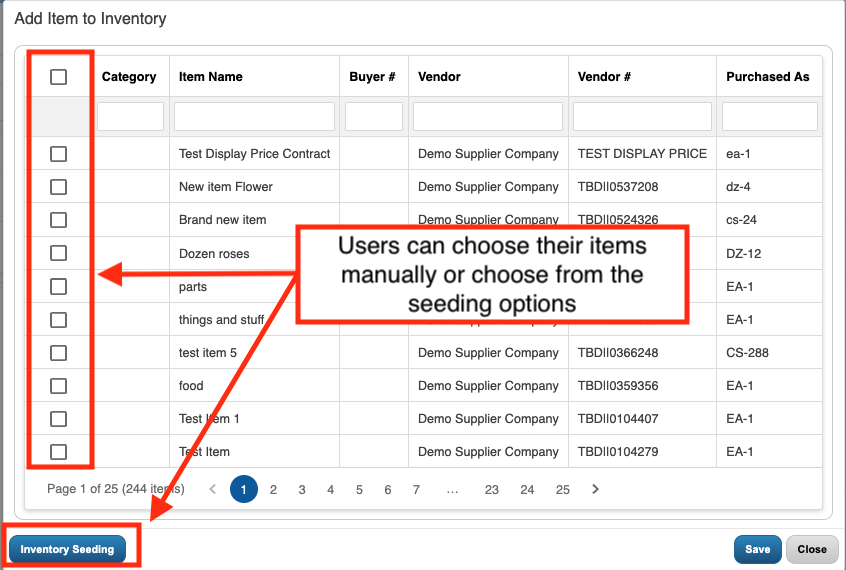
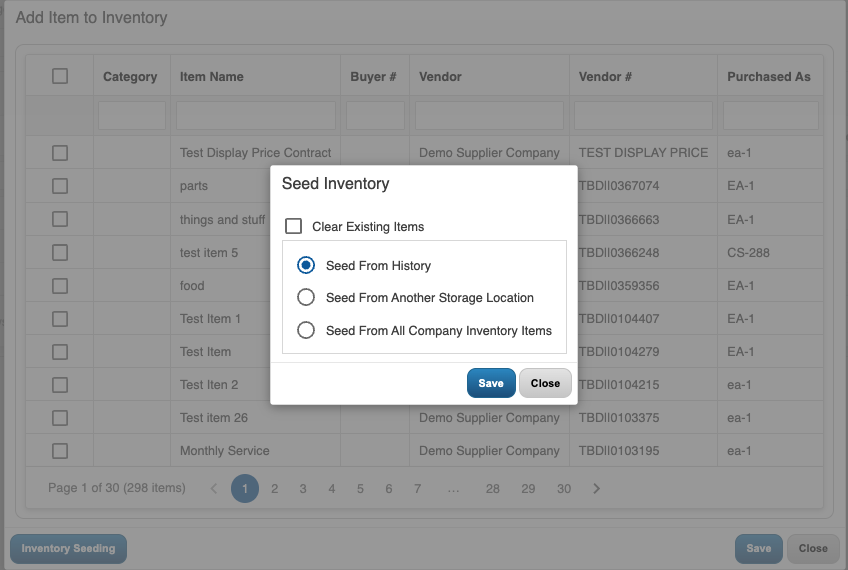
Choose one of the three seeding options:
-
Seed from History – Imports inventory items based on the location's past usage and order history.
-
Seed from Another Storage Location – Copies the inventory list from an existing storage location.
-
Seed from All Company Inventory Items – Pulls in every item available across the company.
-
-
Confirm your selection and review the generated inventory list.
2. Configuring Required Fields
Inventory actions and items cannot be saved if required fields are missing. Complete the following configuration:
Item Editor Screen Inventory Settings:
-
Navigate to View > Item Administration > Item Editor Screen
-
Navigate to the item's Inventory Settings
-
Ensure the following required fields are filled in:
-
Outer Count – Enter the number of units per outer package.
-
Inventory UOM – Select the correct unit of measure for inventory tracking.
-
-
Save the item configuration.
Receiving Screen:
-
Navigate to View > Receiving
-
Select the location
-
Select the PO Number
-
Mark whether the item is a Master Item (Yes/No).
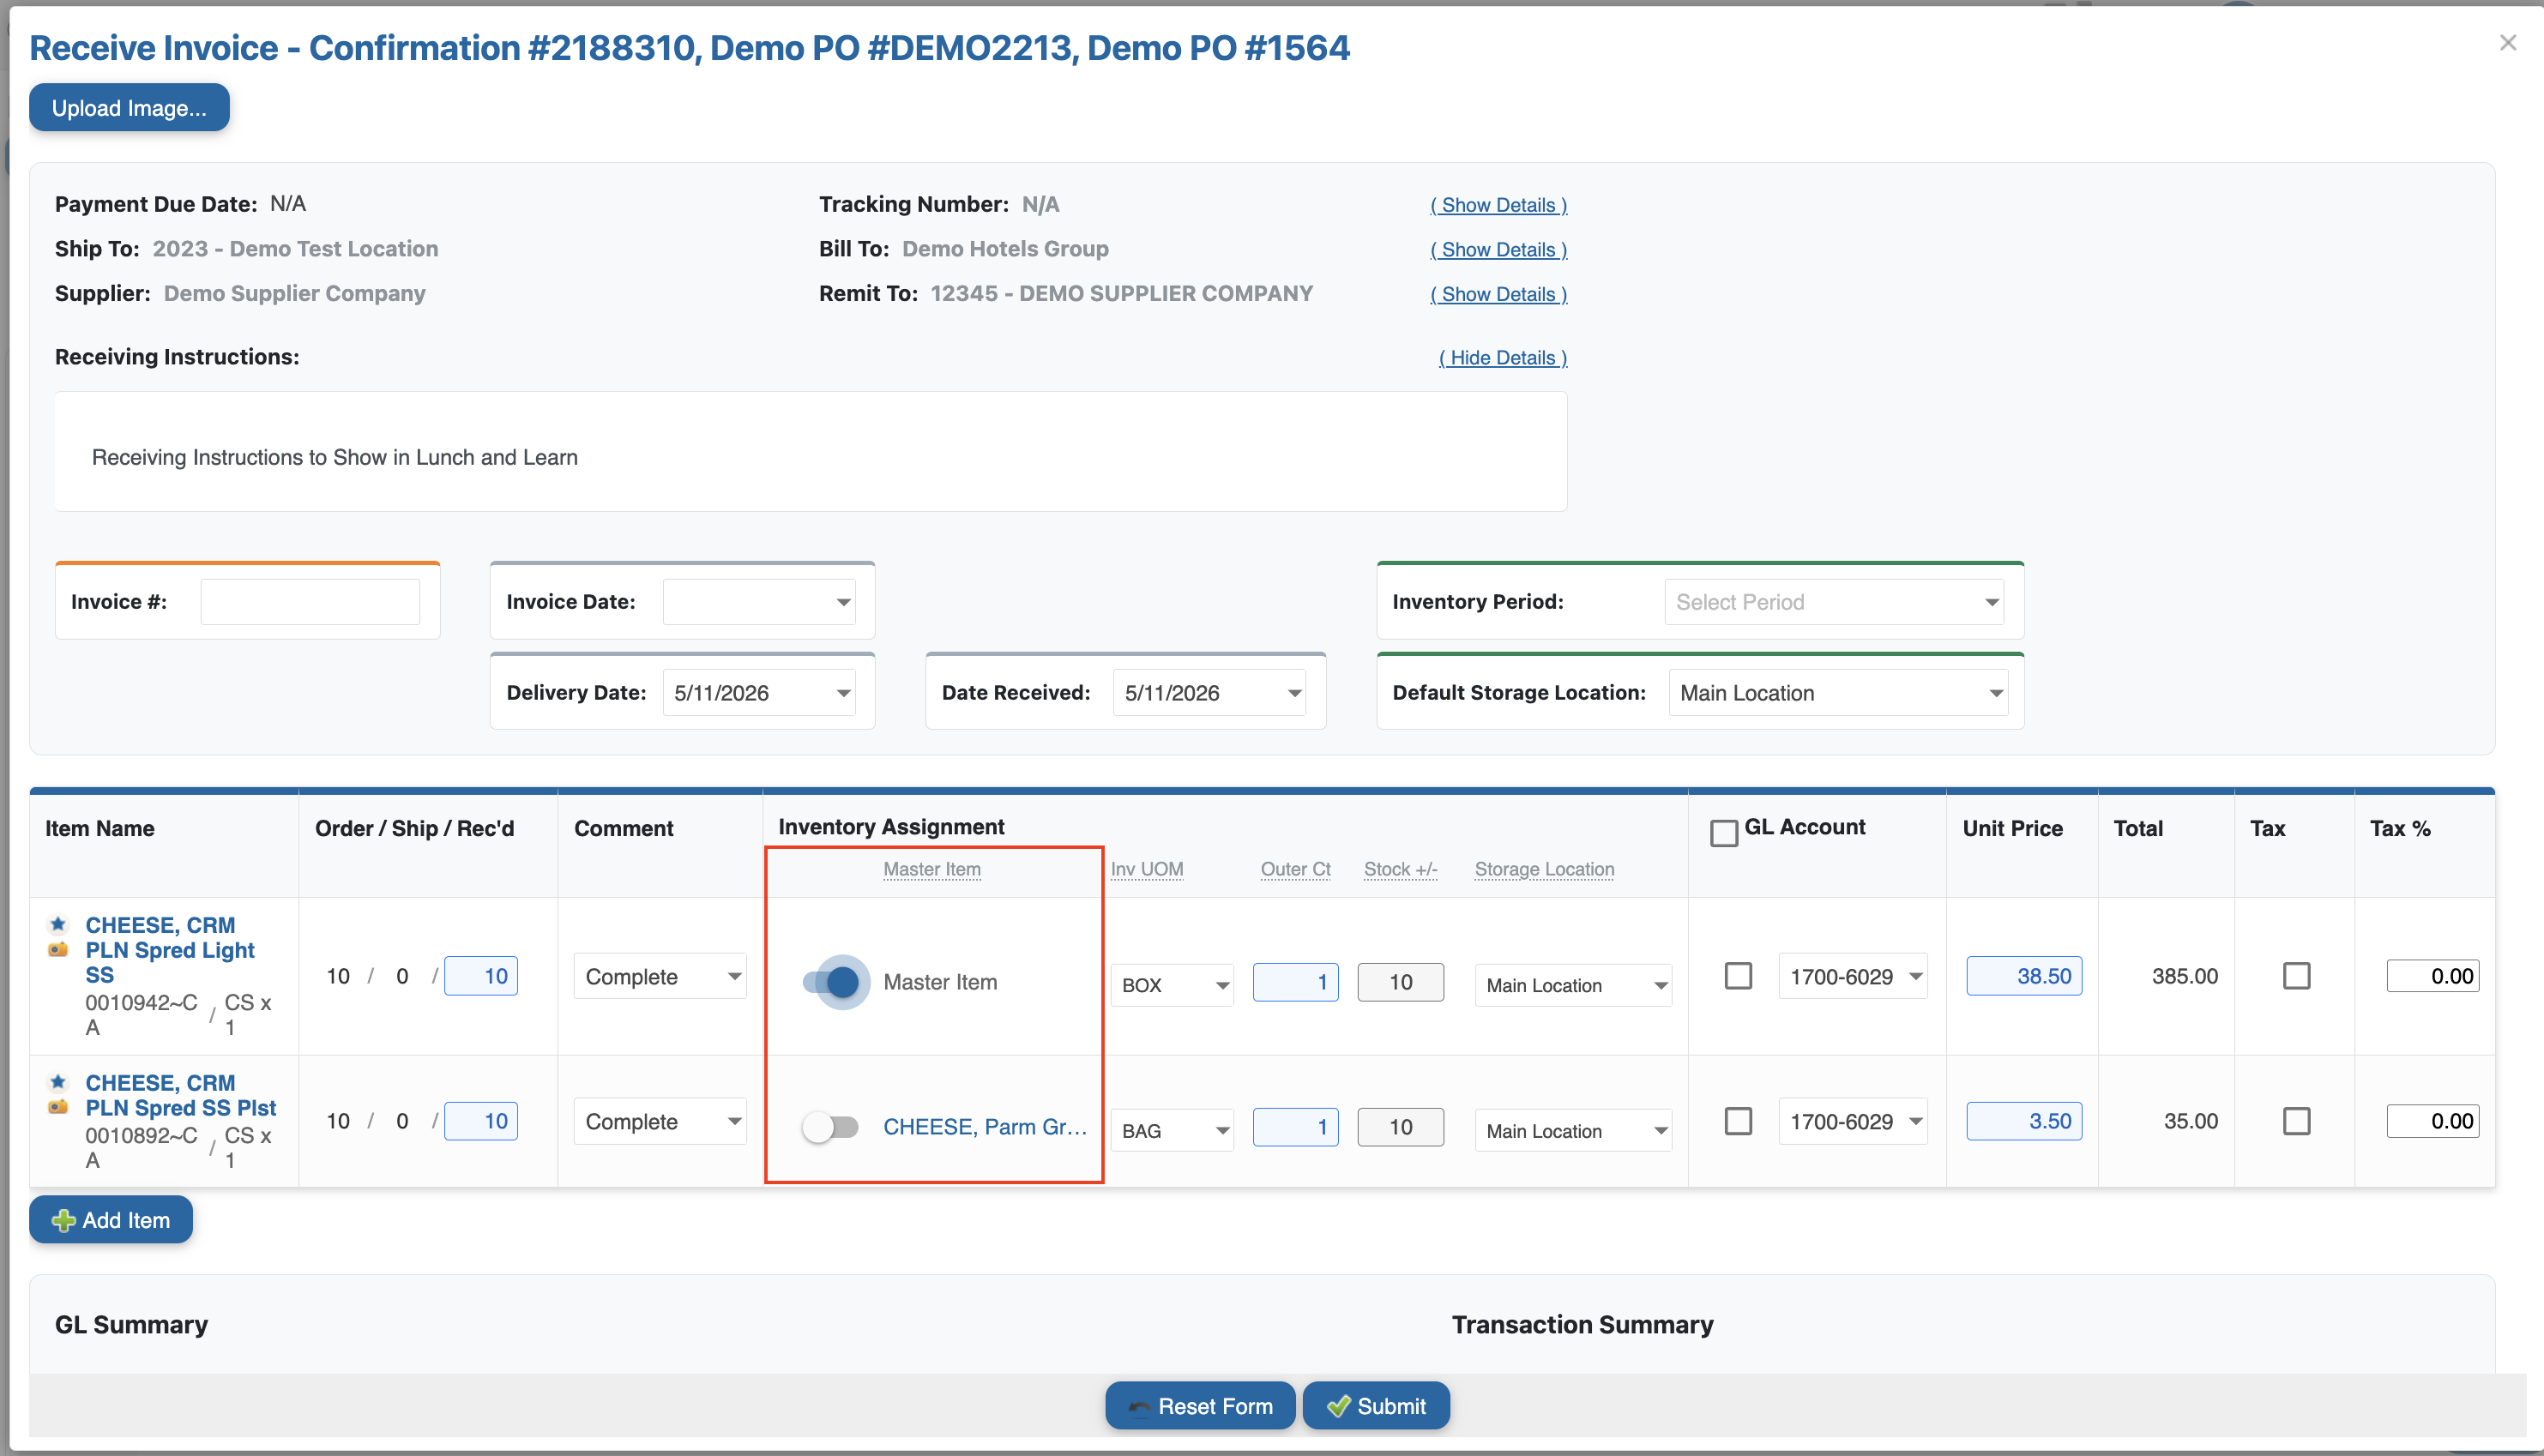
-
Fill in the following required fields for submission of the PO:
-
Inventory UOM
-
Outer Count
-
Storage Location
-
-
Only Inventory Administrators and Corporate users will be able to edit these items.
3. Managing Master Items on the Count Sheet
During a receiving event, if an item is marked as a Master Item, that item will automatically get added to the Count Sheet.
-
Navigate to View > Receiving
-
Select the location
-
Select the PO Number
-
Locate the item you want to designate as a master item.
-
Toggle or check the Master Item field to mark the item as a master item.
-
Save the changes.
-
Navigate to the Count Sheet to confirm the item now appears automatically.
4. Adding or Removing Items from Inventory
To Add an Item:
-
Navigate to View > Inventory > View by Location
-
Select the target location.
-
Click Add Item (or the equivalent action button).
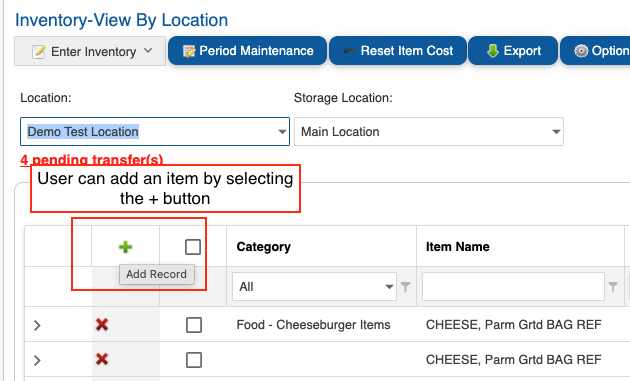
-
Search for the item you want to add by name, code, or category.
-
Select the item from the search results.
-
Confirm the addition and verify the item appears in the inventory list.
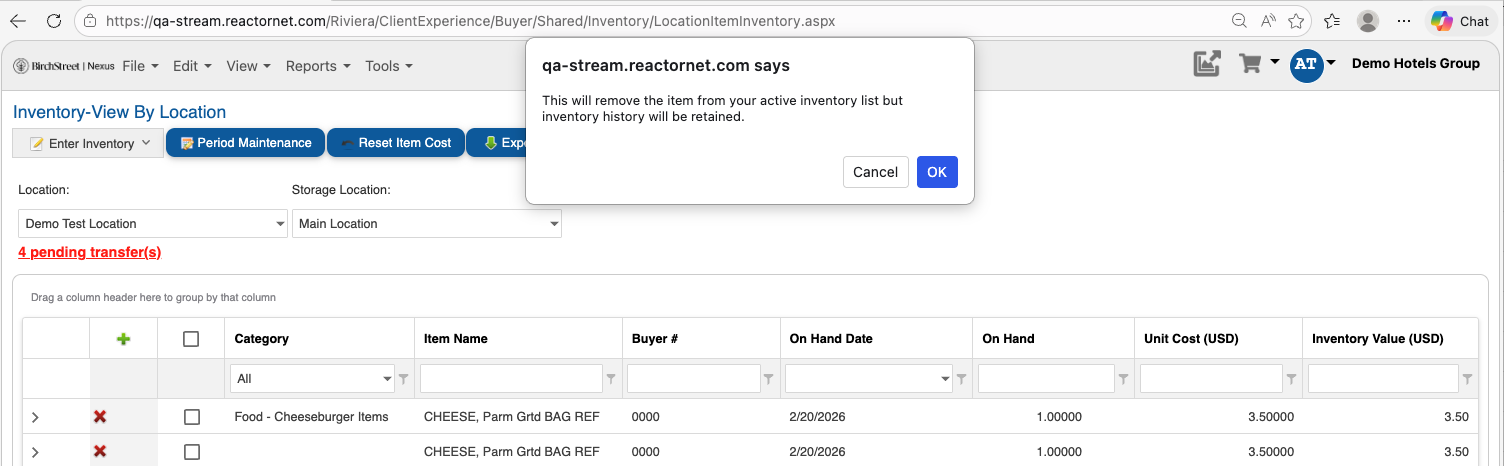
To Remove an Item:
-
Navigate to View > Inventory > View by Location
-
Select the target location.
-
Locate the item you want to remove from the inventory list.
-
Click Remove (or the equivalent action button) next to the item.
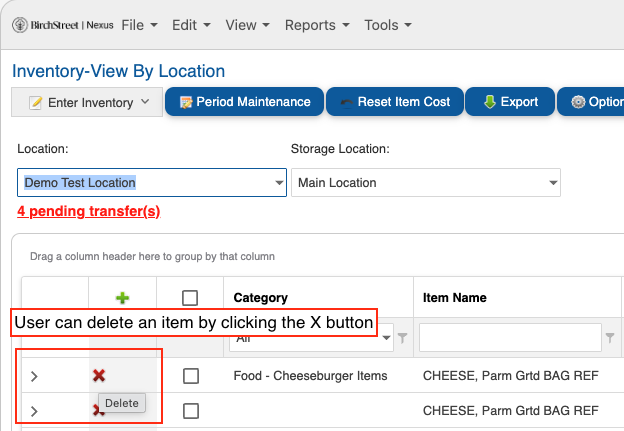
-
Confirm the removal when prompted.
5. Performing a Reverse Entry
-
Navigate to View > Inventory > View by Location
-
Choose the target location.
-
Choose the storage location.
-
Select the item you would like to edit
-
Select the Delete option for that transaction you would like to reverse.
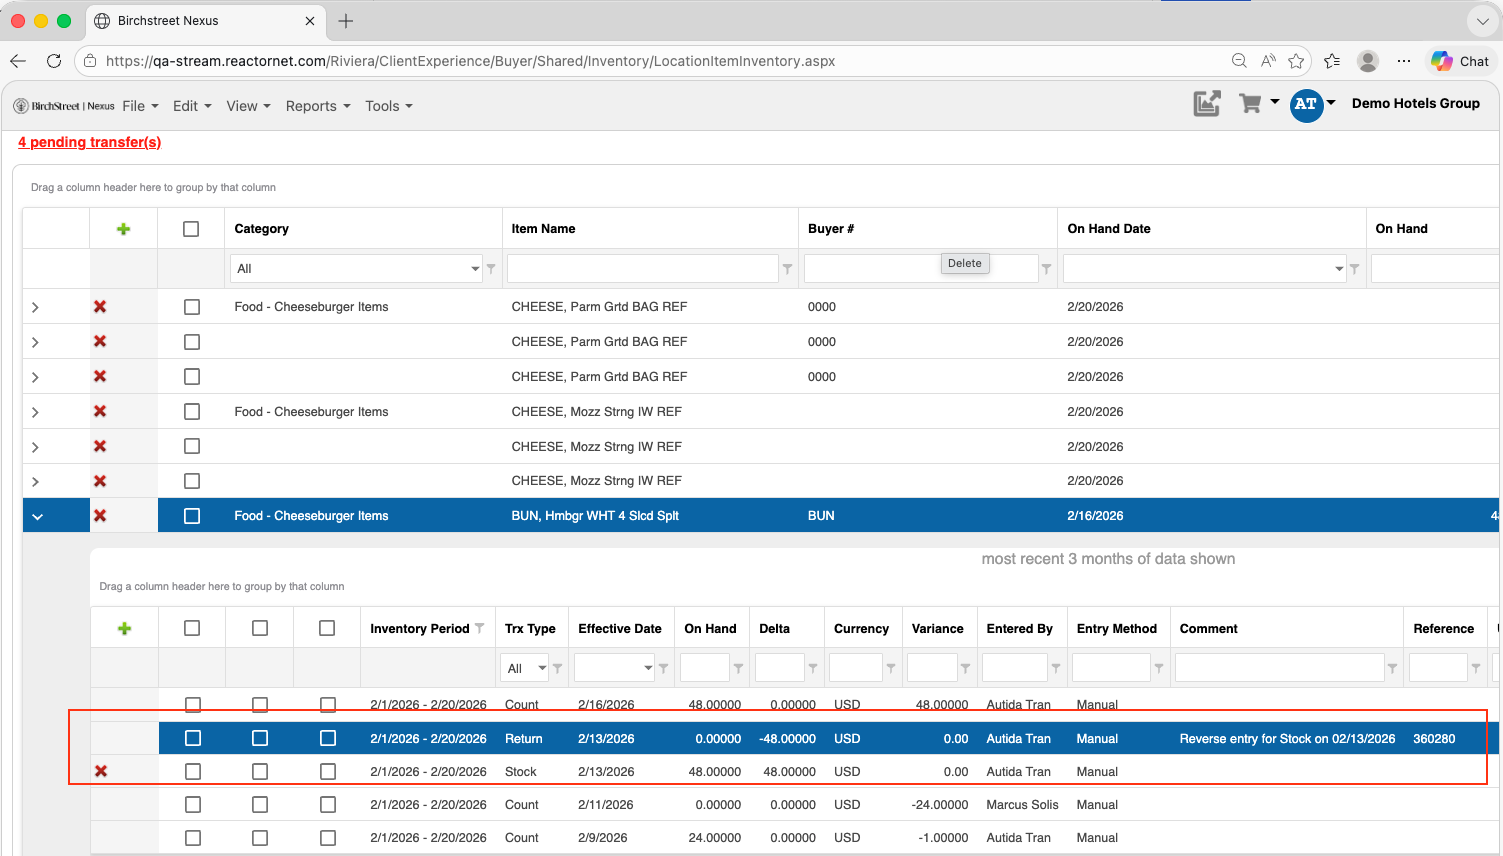
-
Confirm the reverse entry.
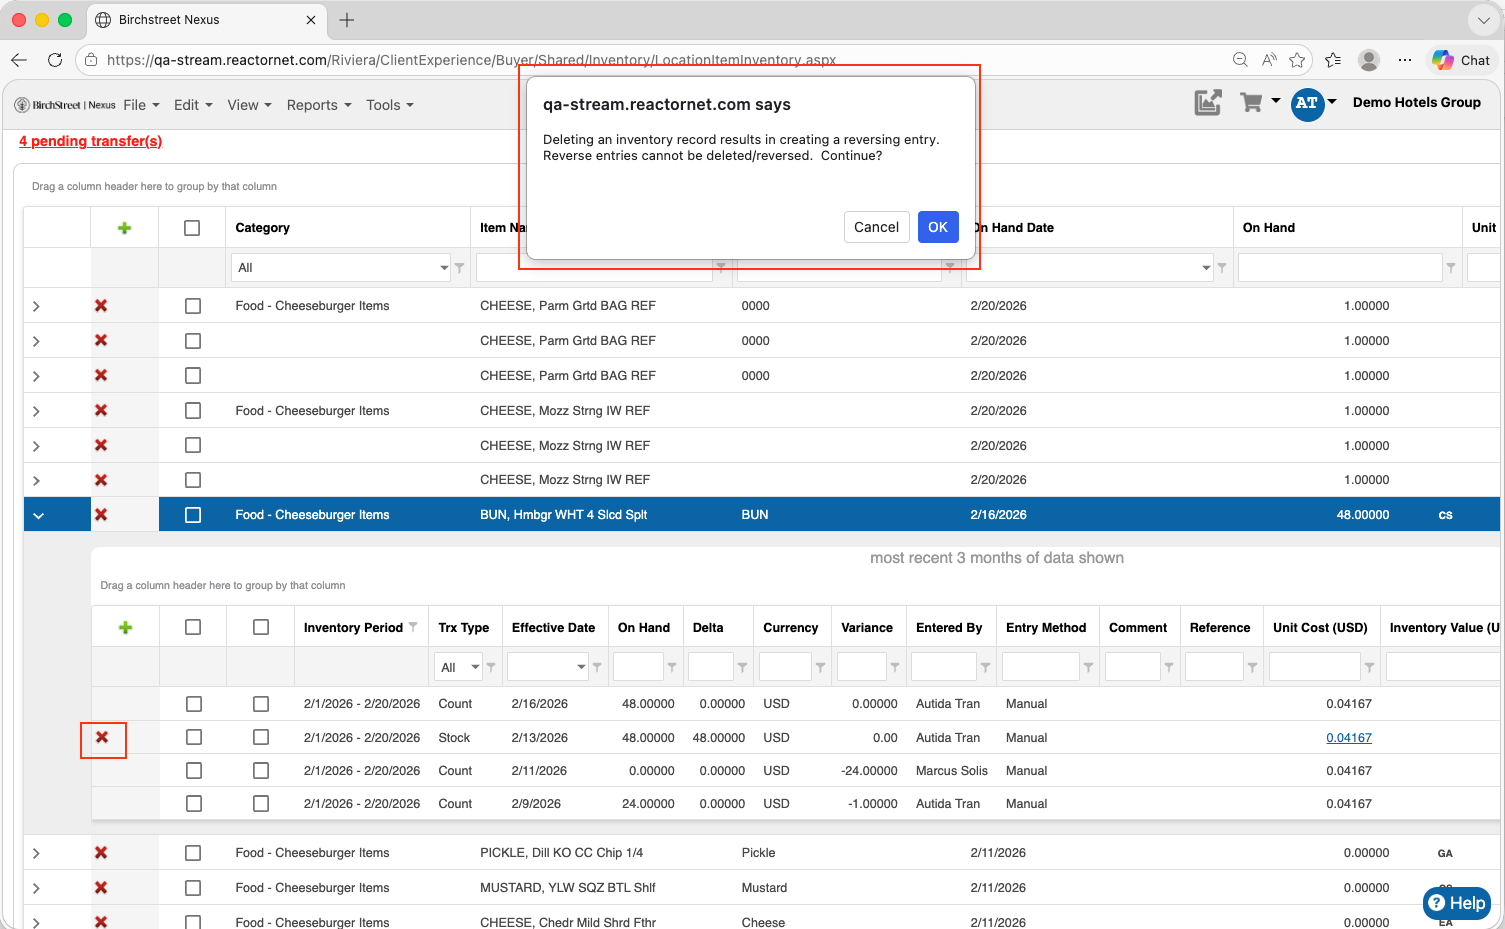
-
Review the updated inventory transactions.
6. Using Receiving Page Display Features
-
Navigate to View > Receiving.
-
Choose the target location.
-
Choose the PO Number to open the Receiving Invoice Page.
-
Review the column headers – hover over any column header to see its tool tip with a description of the field.
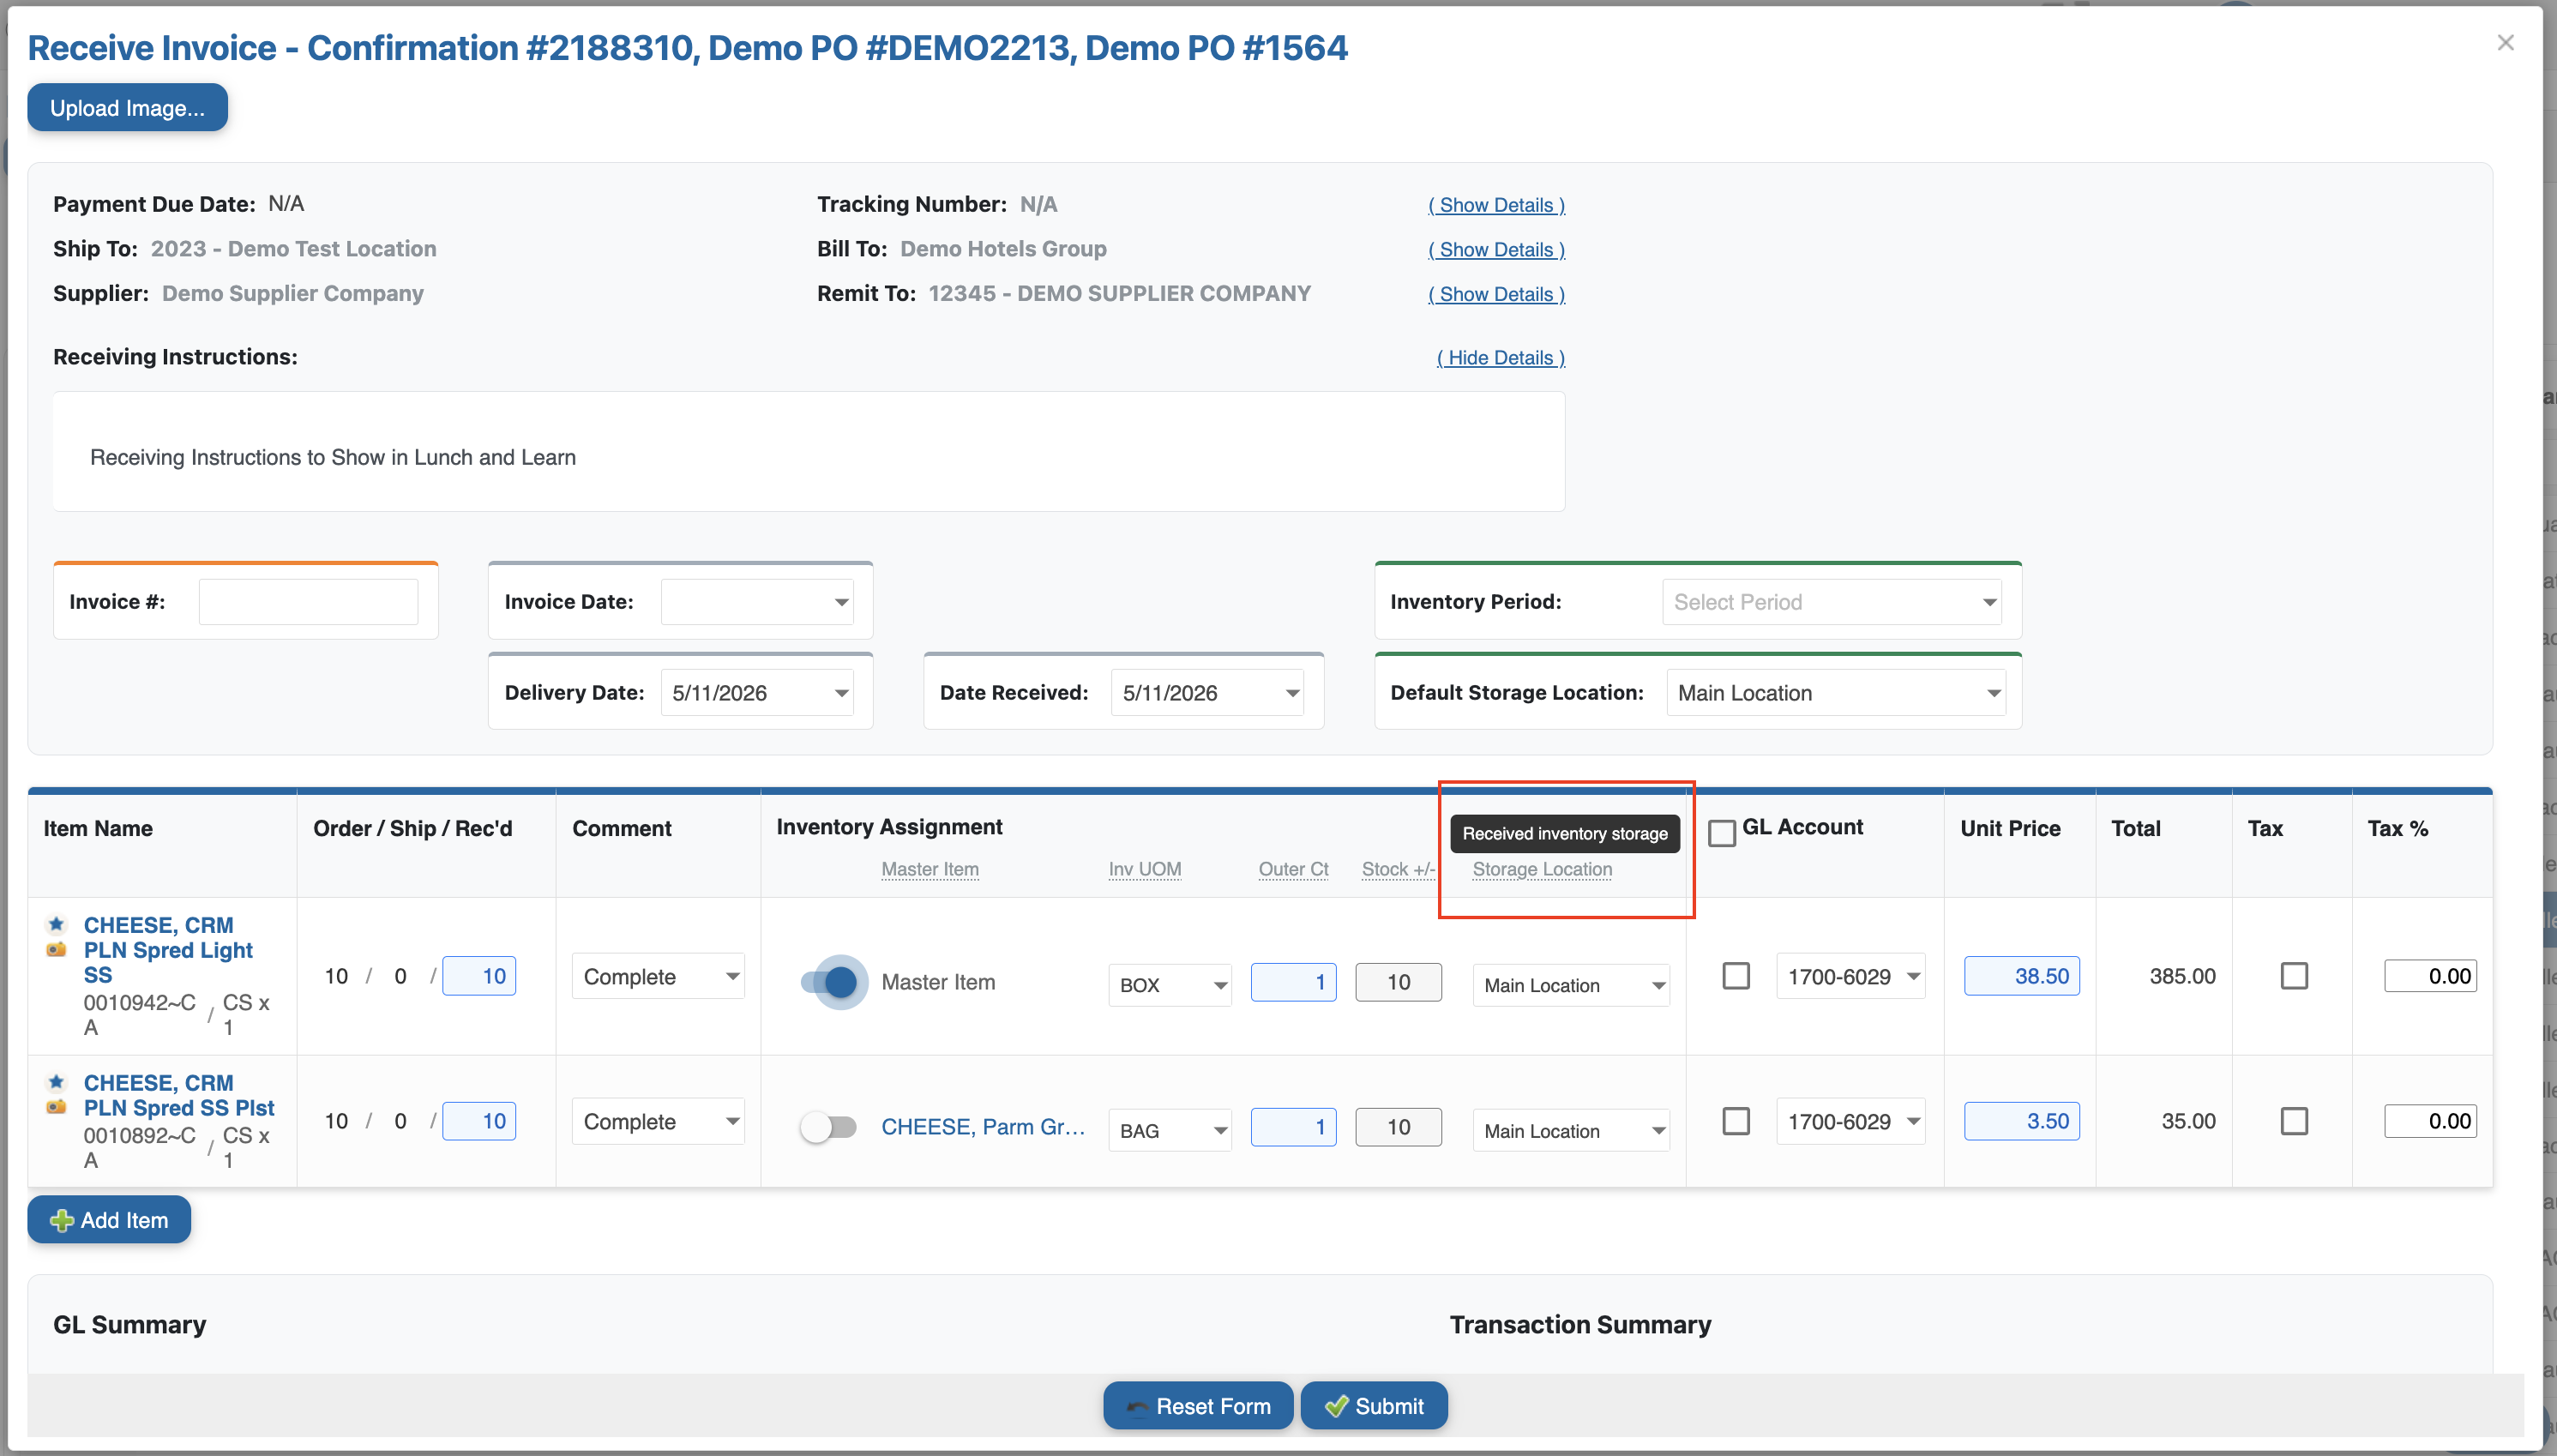
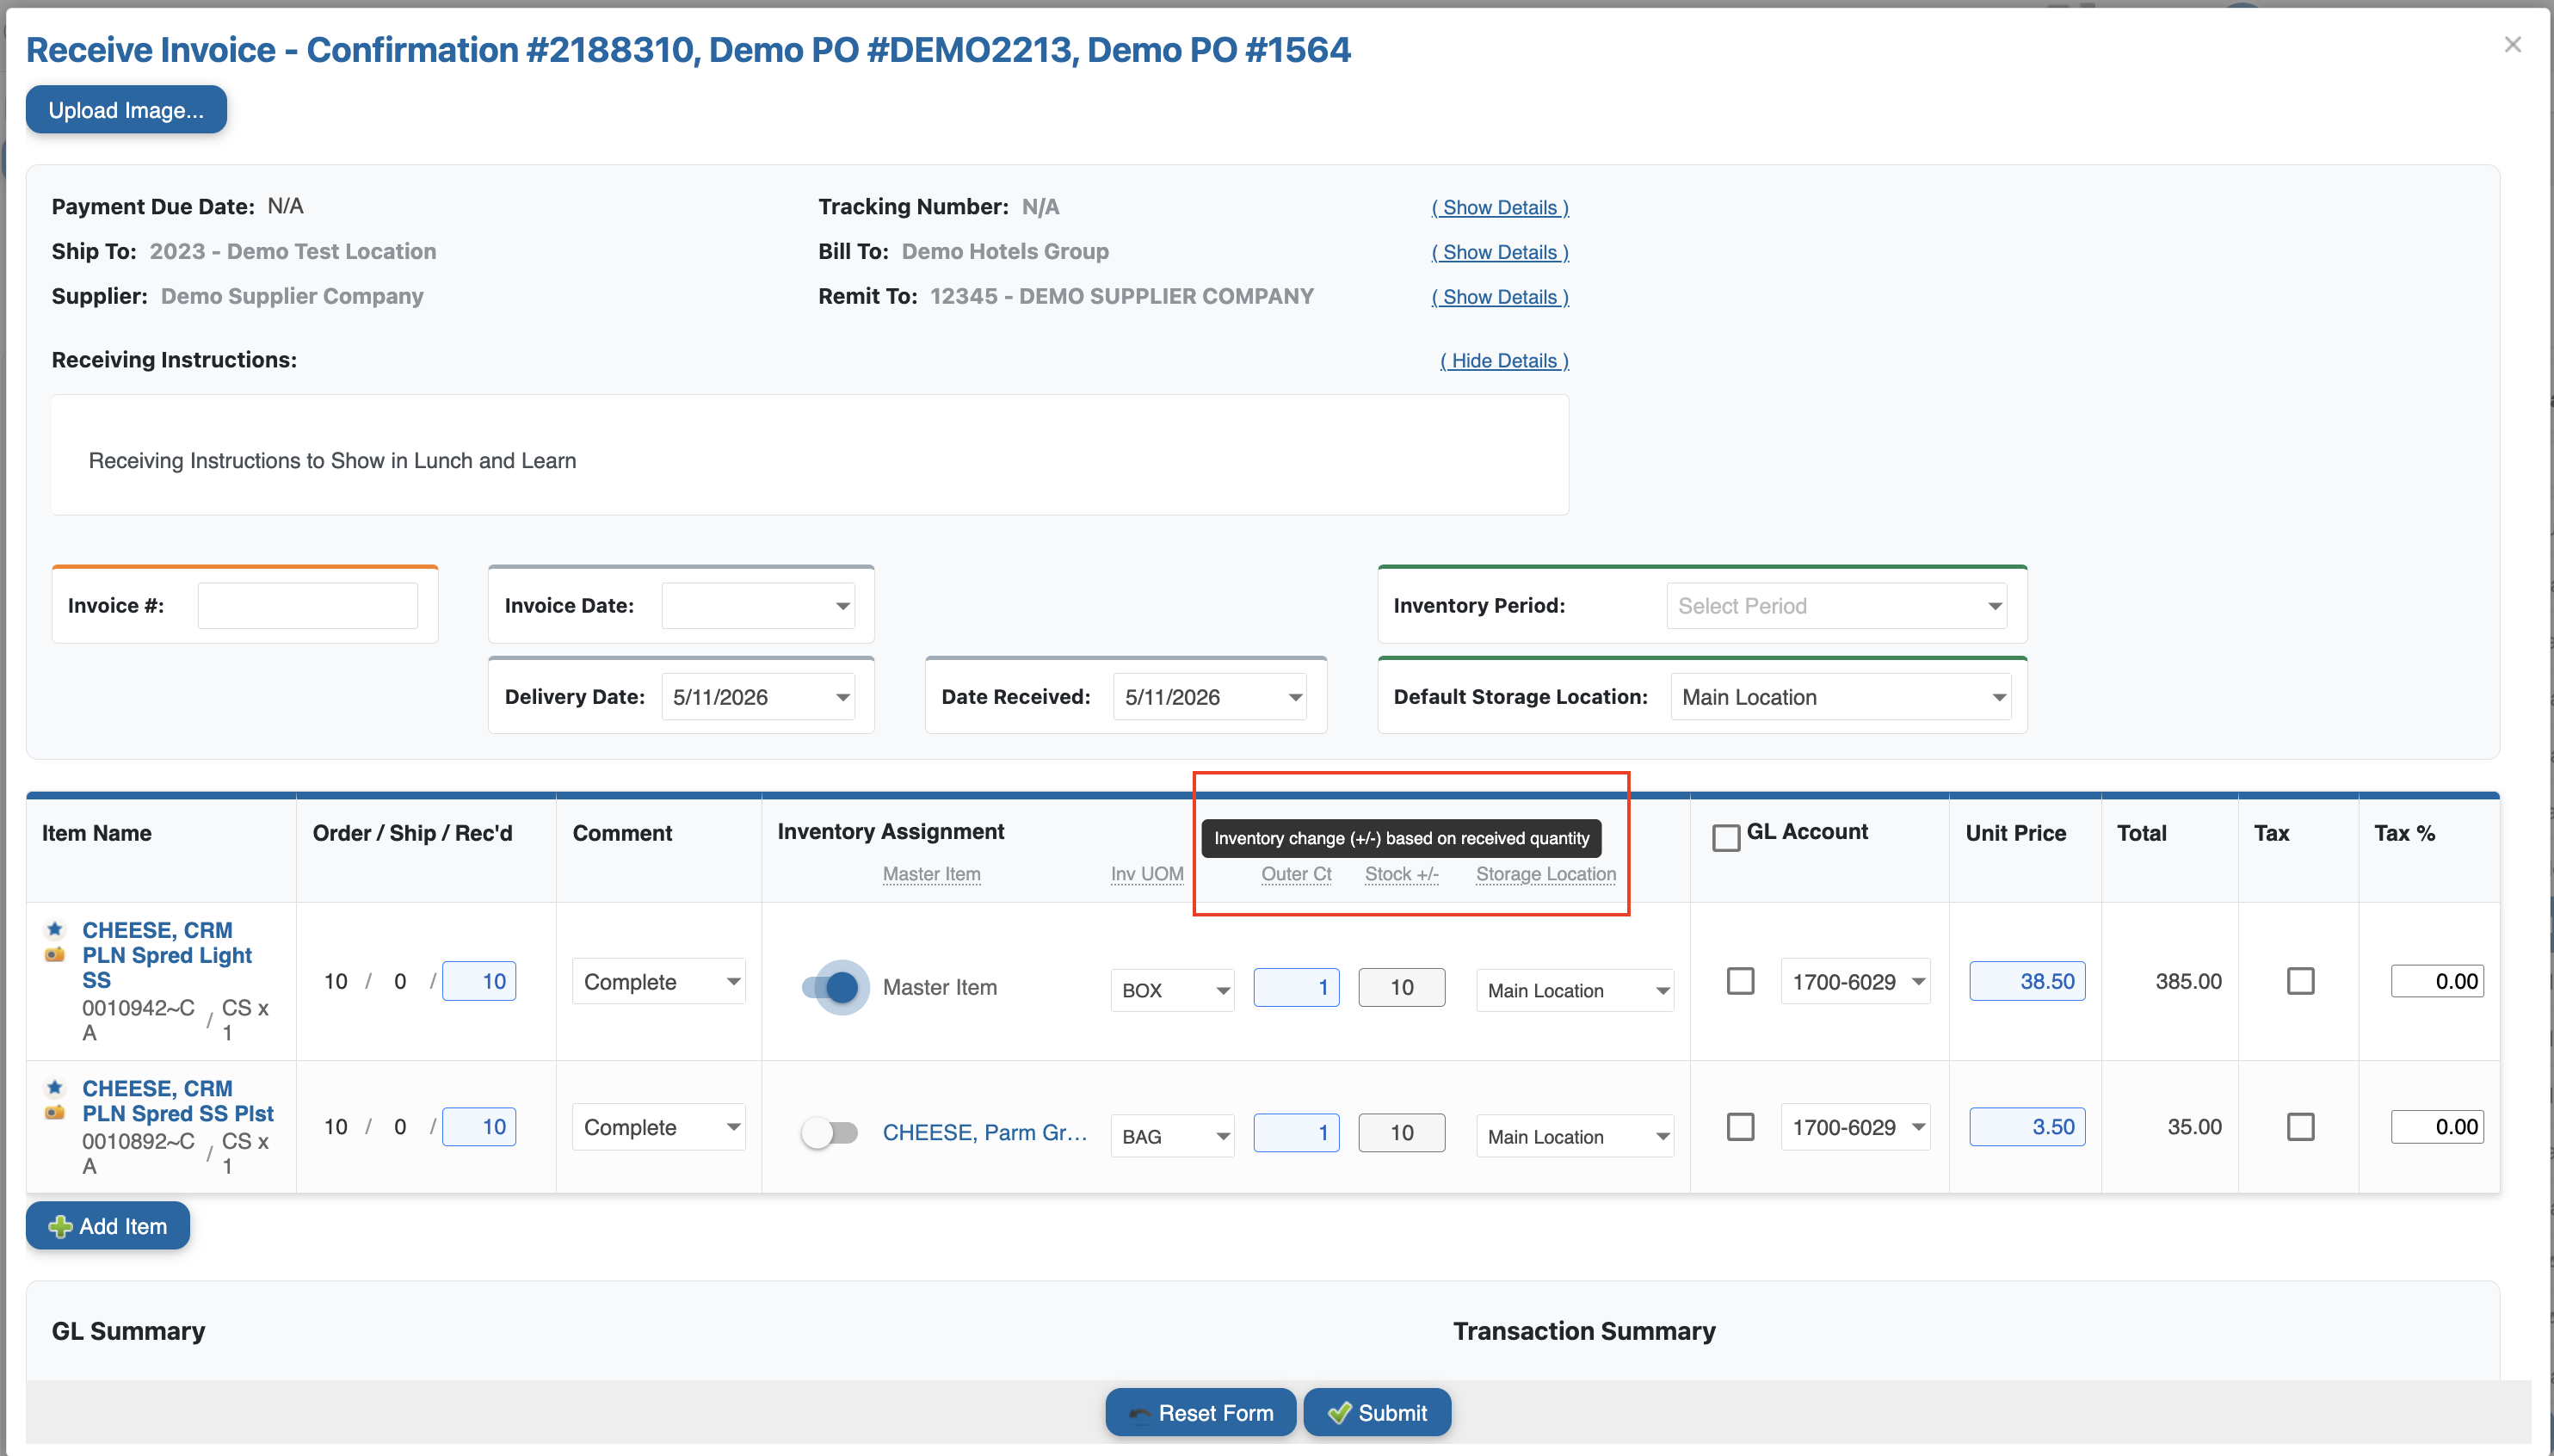
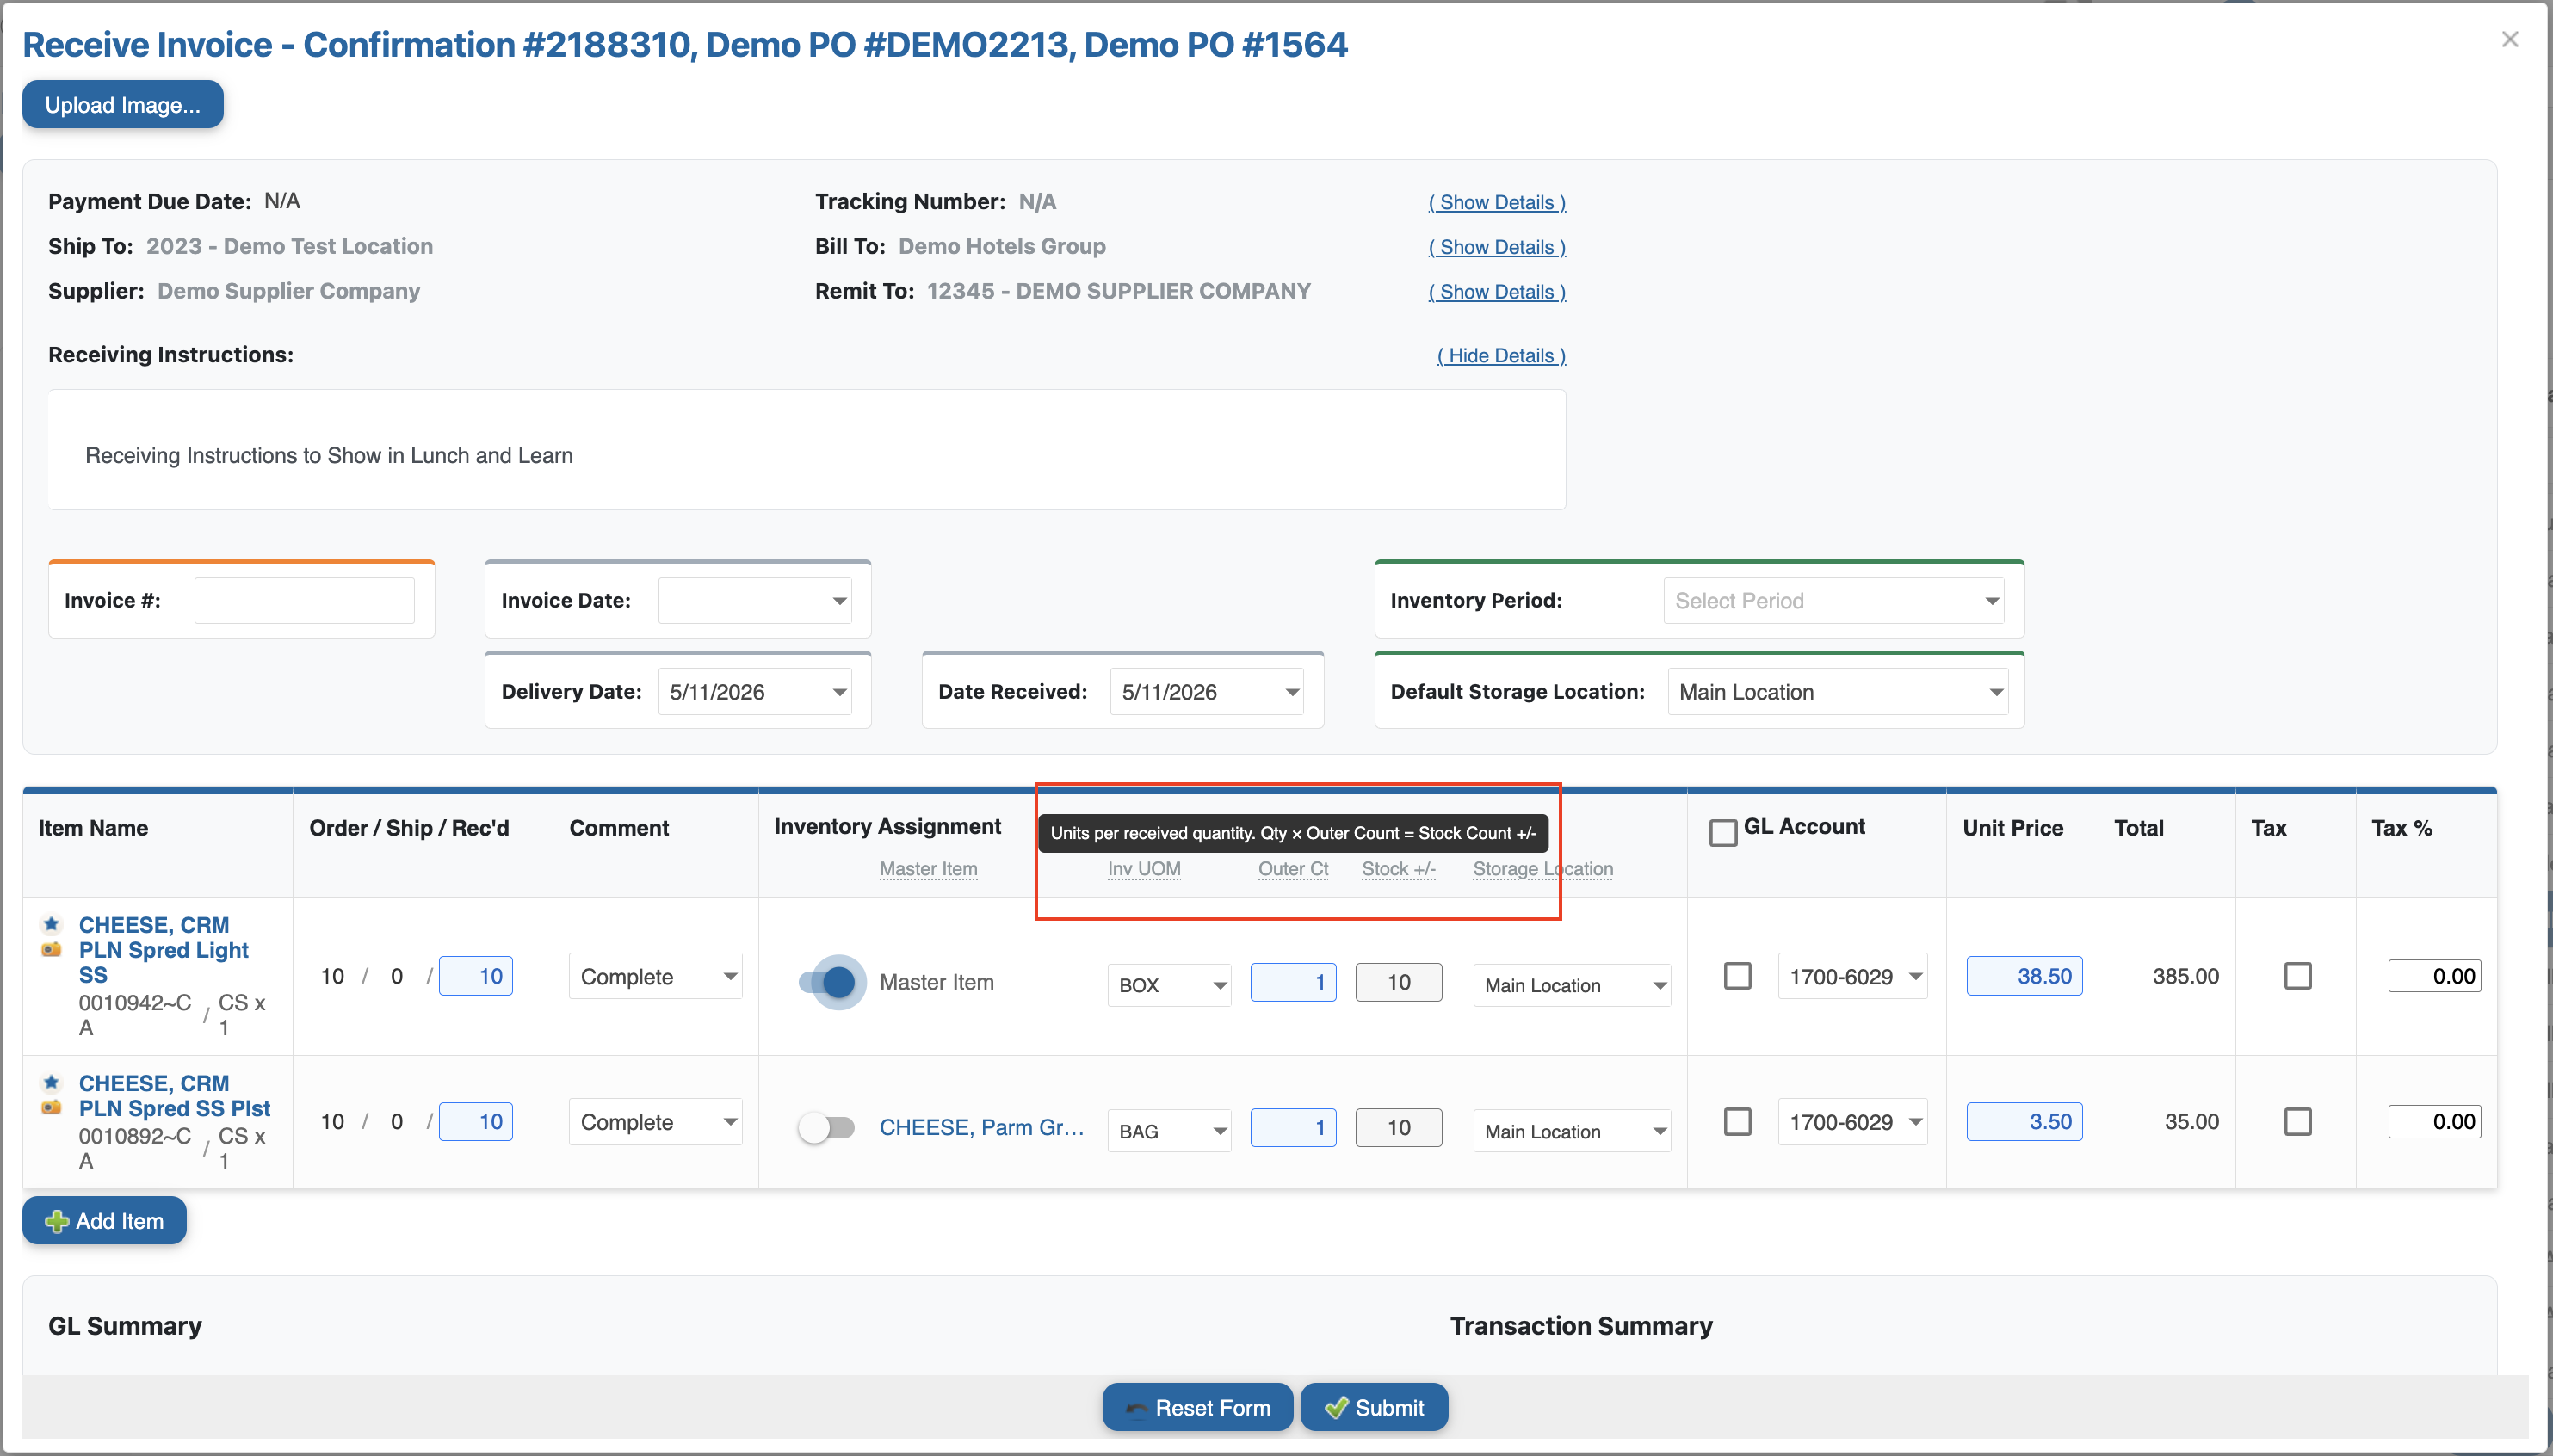
-
Check the UOM column to verify the unit of measure displayed for each line item.
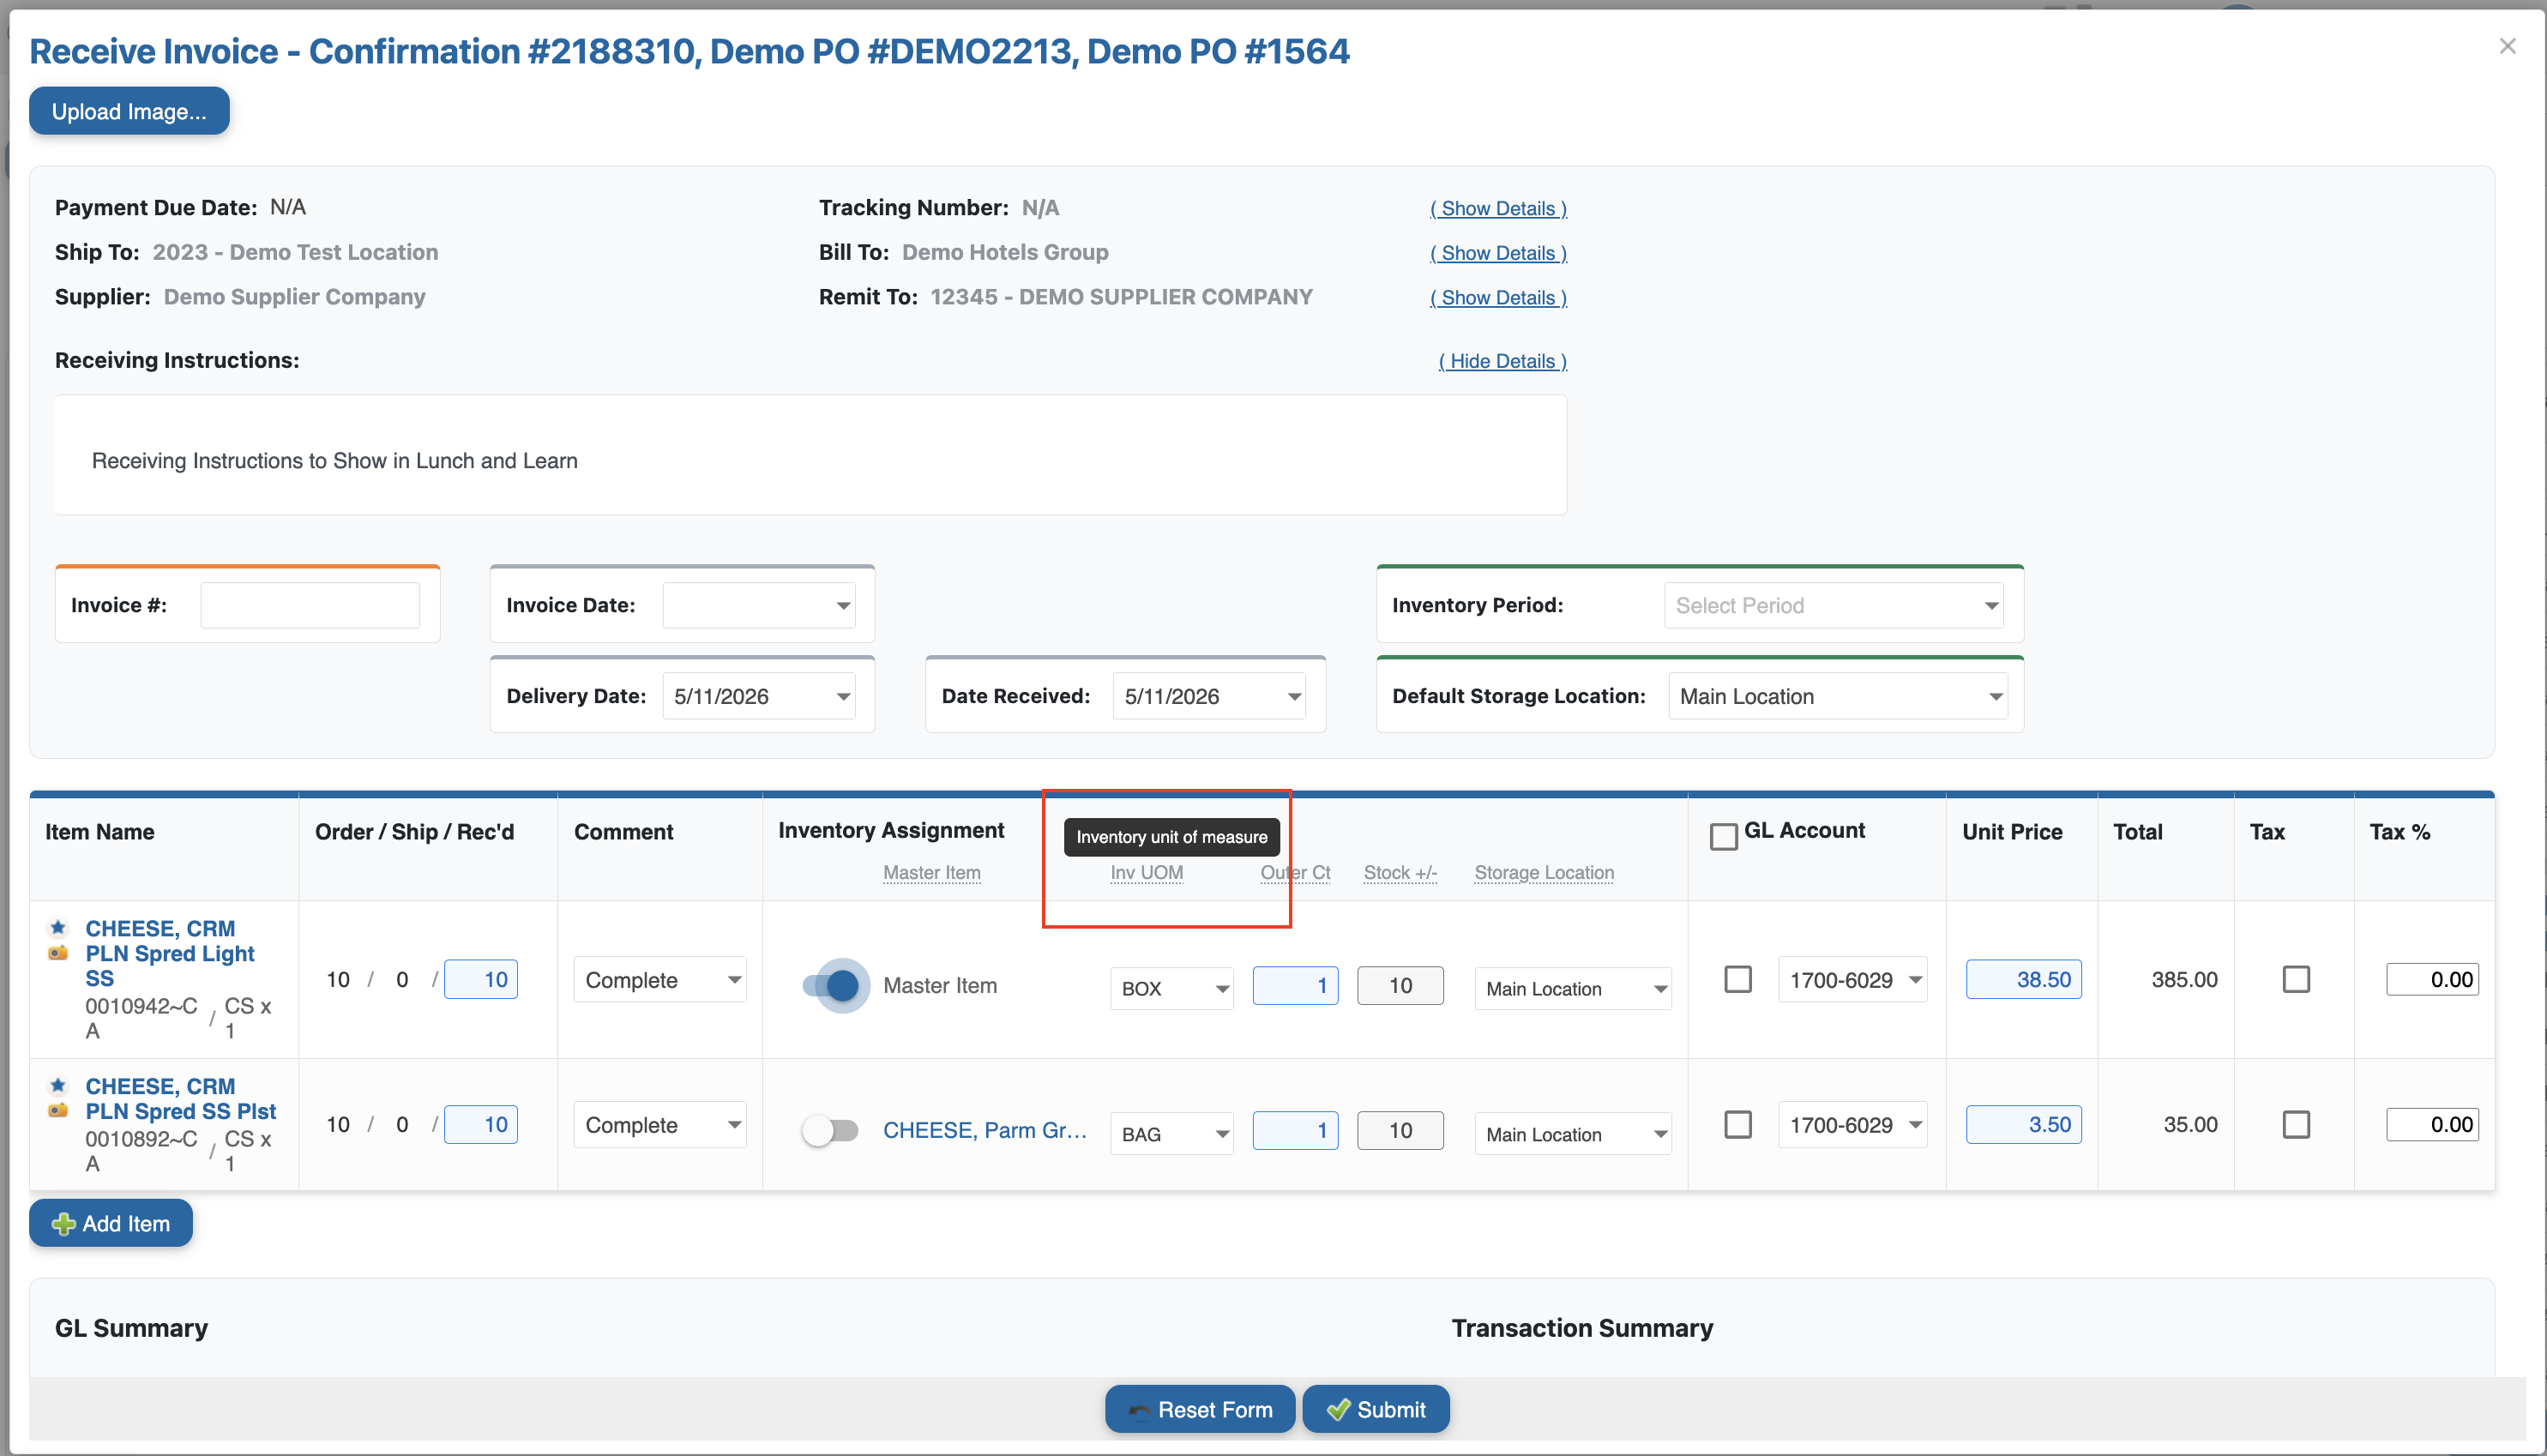
-
Use these tool tips and UOM details to ensure receiving entries are accurate.
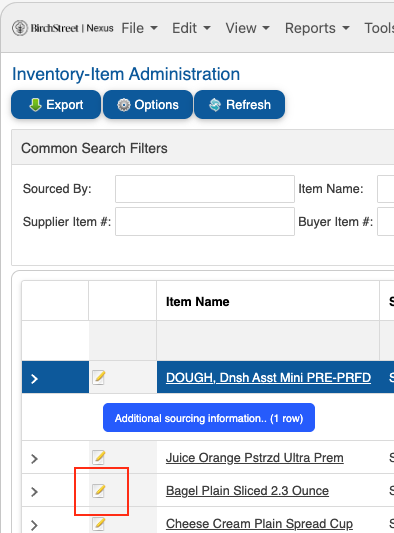
7. Viewing Inventory Item Locations
-
Navigate to View > Item Administration
-
Search for or select the item you want to review.
-
Open the item's detail view.

-
Locate the Locations section, which displays:
-
Each location where the item is available.
-
The on-hand amount at each location.
-
-
Use this information to assess stock distribution and plan transfers or orders as needed.